You can’t be proud on everything you do, for most great achievements, failures were made before. Well, my project isn’t finished yet, but I already made a huge failure, does that count?!
For sure I have toasted a lot of electronic components so far in my life. Mostly caused by working too fast without letting my brain enough time to calculate the consequences. I guess, as a maker who has mostly practical knowledge, this is rather normal. Most electronic components are priced well under one Euro and therefore it’s not too bad, if such a component dies. However, a genuine microcontroller, purchased from a well known distributor can easily cost 10 Euro per piece. If such an IC releases its magic smoke, it starts to hurt.
Not comparable to a Raspberry Pi though. These single board computers cost more than 30 Euro and it’s a real pain to loose one of them. So what exactly happened you might ask…
In my previous post, I already told, that I was buying a laser cutter. Since that laser cutter is one of the extremely cheap ones from eBay, I decided it would be a good idea to have some security features implemented. A device should for example check, if the water pump (for cooling the laser tube) is properly running, the exhaust fan is turned on, the lid is closed, water temperature is ok and so on.
Since I have never before worked with Node-Red I thought let’s give it a try for this project, because it comes with an excellent dashboard extension and let’s you easily create nice looking controls on a web site. So I could just simply put a tablet or my smartphone next to the laser cutter and make some adjustments. Adjustments like, to move up or down the laser table inside the laser cutter.
Initially I though about an Arduino as central unit, but since I also wanted to add a camera to the laser cutter inside, a Raspberry Pi was already mandatory and the new idea was to completely set on a Raspberry Pi, also for the table control.
It turned out, that Node-Red is awesome. As a old-fashioned programmer (who writes source code) it was uncomfortable in the beginning to use drag&drop to arrange boxes in a so called “Flow” and connect them together with lines. For sure, it took a few evenings until I figured it out, but in the end it was working great!

Installing Node-Red on a Raspberry Pi will also install a special extension to access the GPIO pins on as Raspberry Pi (if you want to). This is great for reading the status of sensors of controlling for example relays to turn on auxiliary systems (such as water pump, fan, …).
In the middle of the screenshot above, you can see the section “Table Adjustment”. This was initially planned for the Arduino to control. However, once I noticed, that I can also call Python scripts using an “exec” node in my Node-Red flow, I experimented with controlling the table with the Pi directly. The table is basically just a stepper motor which moves a belt around to raise or lower the table. As a motor driver I was using the popular A4988 (probably a cheap clone, not the original Pololu one).
The A4988 driver needs to voltages. The logic for the IC itself, which is either 3.3V or 5V (when delivered from the Raspberry) and the motor voltage. I wanted to drive my motor with 24V and lower current. The system was working perfectly.
I had ordered five of these motor controllers and four of them were dead (three were DOA, one died somehow during the first tests). To make sure, the other four were really dead, I decided to remove the A4988 from the breadboard and insert another one.
Once I removed the A4988 (while the Raspberry Pi was still on), I noticed, that my Node-Red dashboard does no longer properly refresh. Then error messages were displayed and the site tried to reconnect.
I was checking the Raspberry Pi 3 A+, power LED was still on. Unplugging and plugging it back in resulted in only the power LED to be lit. The activity LED stayed off. That was the moment I realized, there is something wrong. In my panic, I connected a HDMI monitor to have it confirmed: No picture!
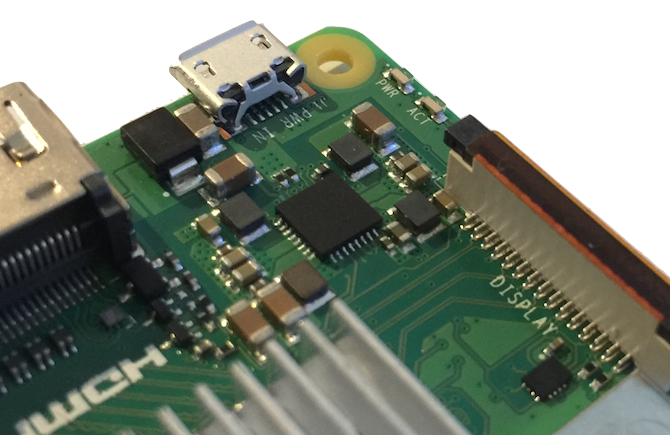
Then I checked the schematics and the voltage rails on my Raspberry to find out, that (at least) the 3.3V rail is gone. It measured just 0V. Responsible for generating the 3.3V (and three other voltage potentials) is the MXL7704-R3 IC in the corner next to the micro USB power connector (see picture above).
It’s a very small QFN package but nothing is impossible, so I searched the internet for information about this IC and I found several entries in the Raspberry Pi forums from users with similar issues. The 3.3V rail is gone after they accidentally shorted out the 3.3V line with some other GPIOs.
I didn’t do that, but I think that unplugging the A4988 while the stepper-motor was enabled and the Raspberry Pi worked, was my failure. I guess the 3.3V rail was overloaded when the 24V from my lab bench power supply was no longer present on the motor driver. Don’t know, just a guess.
I kept reading about the IC and unfortunately I found out, that it’s not just a simple voltage regular. It’s an “intelligent” PMIC which has to be programmed in order to deliver the correct voltage potentials. Additionally, the MXL7704 is actively communicating with the main Broadcom SoC of the Raspberry by I2C to set voltages (for example lower the voltage for the SoC during idle).
Replacing the PMIC with four alternative voltage regulars is also not the way to go, because if the SoC can’t communicate with the PMIC, the SoC is halted and the Raspberry Pi does not boot.
Someone from the Raspberry team commented on the forum posts and stated, that they are using a very special version of the MXL7704 which can’t be purchased separately. They clearly recommend to trash the Raspberry Pi and get a new one (or get the PMIC from another Raspberry Pi 3, desolder and solder it on the other Raspberry Pi). That’s ridiculous!
To be honest I’m a bit disappointed, that the Raspberry Pi Foundation is using such ICs which are unable to be sourced as a private person. I though the spirit of something for a maker should also allow the maker to fix things that were messed up.
However, I was continuing my search and found a Russian YouTube video from someone, who replaced the PMIC with one ordered from AliExpress. And that guy said, the Pi works again. I headed over to AliExpress to search for the “R3”-version of the IC and sure enough, I found it. Within the customer reviews of the offering I even found several comments, that they could revive their dead Raspberry Pis with that IC.
For sure, I ordered two. That means, I have two tried not to mess up again. Keep visiting my page for the follow-up…